Friday, September 28, 2012

Fisher House: Oatmeal Craisin Chocolate Bar Cookies


Well it’s that time again time to make a part of a meal for the Fisher House! I think I mentioned it last month but I love being able to bake something for people to enjoy and maybe just maybe it makes their day a little better. One less thing to worry about and maybe a little bit of comfort given! I love that our Battalion is continuing to give back to this great cause! As a Mom it just feels right to help with food! I love this idea! So for those of you who didn’t see my post last month the Fisher House is a great organization that helps families of Soldiers by giving them a place to stay while their loved one is receiving medical care! Check out last month’s post HERE!

This month I decided to make Oatmeal Raisin Cookies, but as I was getting all my ingredients together I realized that I had no raisins and only about 2/3 of a cup of Craisins. So I decided to improvise, I mean that’s what us Army wives do right Adapt and Overcome? So I used the 2/3 cup of Craisins and then added about a ½ cup of Chocolate Chips, cause chocolate makes everything better right?

Here’s what you’ll need:

Oatmeal Craisin Chocolate Bar Cookies

(Recipe slightly adapted from quakeroats.com)

1 stick+6 TBSP BUTTER

¾ cup Brown Sugar

½ cup Sugar

2 Eggs

1 tsp Vanilla

1 ½ cups Flour

1 tsp Cinnamon

1tsp Baking Soda

3 cups Old Fashioned Oats

2/3 cup Craisins

½ cup Chocolate Chips (semi sweet)

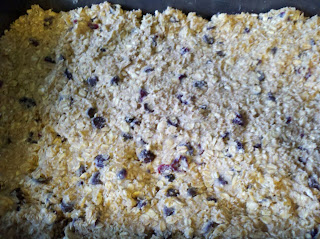
                                         Everything mixes together easily
                                          Put it all into your Baking Pan
                                             Smoosh it all evenly into the pan
Here’s how you make it:

Preheat oven to 350 degrees

In a large bowl cream together sugars and butter, add eggs and vanilla mix well. Add Flour, cinnamon, baking soda, and salt mix well.  Then add in the Oats, Craisins and Chocolate Chips. Press dough into a 9x13 pan. Bake for 30-35 minutes. Cool and then cut into squares.

ENJOY!

Wednesday, September 26, 2012

Fleece Tie Blanket


Last Christmas I made my son a Fleece Tie Blanket, the Hubster was a little jealous of the warm and cozy blanket so I decided to make him one too. He is heading to the Field for the next month and wanted to have the blanket while he is gone. Now most Tie blankets are just a little throw, well that doesn’t work when your guys are tall! The Hubster wanted something that he could wrap up in. So I had to make it extra long. We are talking 2 yards of fabric here. I chose  a football patterned fleece for one side and a solid red fleece for the other. Football and the color red just go together in our house. Hubster is from Nebraska and is a diehard Cornhusker’s fan. So his blanket had to be RED.

Here’s what you’ll need:

2 yards Patterned Fleece

2 yards Solid Color Fleece
Both Fabrics lay wrong sides together and are trimmed up

                                          Measure the 6 inch square
                                         Cut out your 6inch square

                                          Squares are cut from each corner
                                        1 inch by 6 inch strips cut along all 4 sides
                                        Take both pieces of fleece
                                       Wrap the fabric under your finger and over the top
                                        Pull the fabric through the loop that you've made
                                       You made a knot and repeat on all the strips of fabric
Here’s how you make it:

Lay the 2 colors of Fleece wrong sides together. Trim off the salvage edges. Then cut a 6inch square out of each corner. Cut 1 inch by 6 inch strips all along the blanket. Tie each strip. I show in the pictures how to tie them. It’s pretty simple just loop it around your fingers and pull it through. That’s all there is to this Blanket! Snuggle up under it and GO BIG RED!

Monday, September 24, 2012

Italian Crockpot Chicken


I love my Crock pot. I mean I LOVE IT! Seriously makes my day so much better when I can just throw some food in there forget about it and at the end of the day I have a healthy and delicious meal ready for my hungry family! Italian Crockpot Chicken is a Family Favorite! I make it all the time! Again it’s a super easy and inexpensive dinner!

 
Forgot to show the Italian Seasoning!
But you can see it here!
 
 
Here’s what you’ll need:
2-3 Boneless skinless Chicken Breasts

1 can Cream of Mushroom Soup

2 TBSP Italian Seasoning

1 can mushrooms (optional)


Here’s how you make it:

Put everything in the Crockpot and that’s it! Turn it on to Low and let it cook for 6-8 hours! You can turn it on high and cook it for 3-4 hours if you forget to put it in earlier! So simple right? Serve over rice or noodles!
*I didn't put any mushrooms in this time because I didn't have any in my pantry!

ENJOY!


Friday, September 21, 2012

Nutella Cheesecake


Have you seen this recipe on Pinterest? I have and boy is it drool worthy?! So I decided to make this for my Birthday. The Hubster is super busy with Army stuff and I knew he wouldn’t have the time to “make” me a cake which is cool because well I don’t really like cake, and he could pick one up but well I really don’t like store bought cake. I know I know who doesn’t like cake right? I mean I don’t hate it, I just don’t love it! I’d rather have a brownie or cookies or cheesecake! It’s still cake right? lol So For my birthday this year I tried the Nutella Cheesecake recipe from mybakingaddiction. Ok a couple of tips before we begin. 1. Don't be like me and forget the vanilla! 2. Don't press the cookie crust too hard into the cup, it makes it very difficult to scoop out when eating and 3. Make smaller portions! The last one is really just so you can enjoy more of it! The recipe says it make 4-6 serving, I made 5 and felt like 6-8 would have been a decent size as well! It is a great easy recipe and the whole Family LOVED it!


Here’s what you’ll need:
12 Oreo Cookies crushed
3 TBSP Melted Butter
8oz Cream Cheese, softened
2/3 cup Nutella
1 tsp vanilla
8oz container Cool Whip thawed
I used a rolling pin to crush my oreos
                                         I used my tart press to make the crust of the oreo but don't press too hard!


                                          Can you tell what I forgot? Yep the Vanilla!
                                  The recipe says to fold in the cool whip but I just mixed it in!
                                                             Looks Good to me!
                                      I put the plastic bag over a bowl to make filling easier
                                                                           YUM
Here’s how you make it:
    In a medium bowl, stir together the cookie crumbs and melted butter. Place a spoonful of the crumb mixture into each cup and press it in the bottoms of the dishes (I used my tart maker to press it down) to form a crust layer.
   In a large bowl, beat the cream cheese and Nutella until smooth. Add vanilla and the Cool Whip mix until no white is showing.
   Spoon the filling into each cup. Or scoop it into a Ziploc bag and cut the tip off to make it look a little more special. Cover with plastic wrap and refrigerate for at least 2 hours before serving.

ENJOY!

Wednesday, September 19, 2012

Tee Shirt Bags


Tee Shirt Bags

Ok are you ready to be amazed? I have the easiest craft for you today… Tee Shirt Bags! Honestly you are going to be raiding your children’s closets for shirts to use for these bags! My son loves for me to use his shirts that no longer fit but he still likes! They are great to take for overnight bags, road trip bags, pool bags; grocery bags the uses are endless! I got this T Shirt at a marriage retreat this weekend! It was an amazing Retreat given by the Army Chaplains. Honestly if you are a Military Family try and do one of these retreats. This one was called Strong Bonds and was FANTASTIC. Now we happened to arrive a little late and so there was only one shirt left and it happened to be a size small, well I’m not now nor have I ever been a small so I said to the Hubster grab me a shirt anyways I’ll make a bag out of it! YAY! That makes this project like totally free for meJ

                                          This is a night shirt so it's really long!
                                          My top cut is a little off 1st time with a Vneck!
                                          Save the bottom of the shirt for another craft!
                                          I didn't pin mine but you can if you want to I just didn't!
Ended up in a boho bag style that I really like!

Here’s what you’ll need:

 T-Shirt 

Sewing Machine

Matching Thread

Here’s how you make it:

Lay the T-Shirt flat on a cutting surface, with a rotary cutter (you can use regular scissors but rotary cutters are so much easier) cut around the neck of the shirt. Then cut around the sleeves.
If you want the bag to be shorter you can cut off the bottom. Which I did for this bag because after looking at the shirt I think it was a night shirt?!
Turn the shirt inside out, and line up the bottom, pin the bottom together. Sew a seem along the bottom (be sure to back stitch at the beginning and the end).
 That’s it you are done and now you have a great bag that cost you almost nothing! I am probably going to dye this bag at some future point because really white and 2 dogs just don’t work!

ENJOY!

Monday, September 17, 2012

Pumpkin Pie Baked Oatmeal


 The first day of autumn is just days away and there is definitely a chill in the air. I love to have easy yet hearty and warm breakfasts on these kinds of days.  I don’t however always have time in the morning to make something warm and hearty, some mornings I’m lucky to get breakfast on the table at all. That’s where Baked Oatmeal comes in handy! Now you can make this in a cake pan but I really prefer to make it in a muffin pan and then freeze them!  Then on mornings when I’m running late or just don’t feel like making anything I can reheat one or two of these and everybody is HAPPY!

Here’s what you’ll need:

3 cups Oats (old fashioned)

3/4 cup brown sugar

1 tsp salt

1 tsp cinnamon

1tsp pumpkin pie spice

2 tsp baking powder

½ cup Canned Pumpkin ( freeze the rest for another day)

1 cup milk

2 tsp vanilla

2 eggs


I really do need new pans! *hint hint*
I like to drizzle a little honey over them YUM

Here’s how you make it:

Preheat oven to 350. In a large bowl, combine the oats, brown sugar, cinnamon, baking powder, and salt. In a smaller bowl, mix together the milk, pumpkin, vanilla, and eggs. Add the egg mixture to the Oat mixture. Pour into a greased muffin tin. Bake for 25 minutes until golden brown on top!

Enjoy

Friday, September 14, 2012

Inside Out Chicken Pot Pie


My Sister gave me this recipe the other night when I couldn’t decide what to make for dinner! We do that a lot… send a text “what are you making for dinner” “IDK what are you making” and often times one of us ends up making what the other suggested! This was the case the other night. Except she was making Chicken Noodle Soup for her sick kiddos, and she gave me this recipe as well as a few others. I went with the Pot Pie because it was such a simple recipe I couldn’t not try it!

Here’s what you’ll need:

1 can Cream Soup (I used cream of celery because for whatever reason that is the only kind I had in my Pantry)

1 cup of Frozen Mixed Veggies (again didn’t have this so I used frozen peas & frozen butternut squash)

2-3 Chicken Breasts, cooked and cut up

(I also added onion powder, salt & pepper didn’t measure just a sprinkle to jazz it up)

Biscuits for the top

                      I like to have some shredded chicken in the freezer for quick dinners
So simple everything just goes in the pan!

                                 It's ready when everything is bubbly and warmed through


Here’s how you make it:

Add the cream soup + 1 can of water, veggies, and chicken into a skillet. Cook over medium heat until bubbly and heated through. Top with a Biscuit and you are Golden!

*a little side note, my son and I loved the butternut squash, my husband did not ;) *

Wednesday, September 12, 2012

Nutella Cookies


If you like Nutella you are going to LOVE these cookies! These cookies are STUPID EASY! Seriously I can’t believe how easy and delicious these are! I had seen this recipe on Pinterest it was one of those ones where they give the recipe in the description of the picture. I clicked the link anyway and the recipe there is a little different than what the picture said and a little different than what I ended up doing. But here is the link to that Original Nutella Cookie post.
Yes that's really all you need!


Mix it all up! Seriously how easy is this?

                                           The dough is kind of crumbly
                                           Just a scoop of dough about an inch!
                                           smash it down

Here’s what you’ll need:

1 Cup Nutella

1 Cup Flour

1 Egg


Here’s how you make it:

Combine all ingredients in a mixing bowl and combine. It’s crumbly dough.  Scoop out a spoonful of the dough and place it on a cookie sheet. Then flatten the cookie dough with the bottom of a glass.

Bake @ 350 degrees for 5-7 minutes.  That’s where it got a little tricky for me my stove is old and finicky! Next time I will probably cook them @325 for 5-7min.

Enjoy!

Monday, September 10, 2012

Twine Vase


Another twine project for you to get yourselves all wrapped up in! I know that was a pretty bad joke… what can I say it’s Monday! I seriously love all the craft projects that are covering everything under the sun with twine! I mean who thought of this? It’s GENIUS! There are so many ideas, and trust me this won’t be the last twine covered do dad that I make and share with y’all!


Again this is another inexpensive (my favorite kind) craft. All you need is a Dollar Store vase and some twine, which you can also get at yep you guessed it the Dollar Store… side note did you know they are now taking coupons, so now we might be able to get things there for LESS than a dollar! CRAZY right? Ok back to the craft!

Here’s what you’ll need:

Vase

Twine

Hot glue gun


Here’s how you make it:
Before you begin put down some newspaper to protect your table from the hot glue. Start at the bottom (but not underneath or the vase may not be stable) of the vase and glue a small amount of hot glue on, then press the twine into the glue. BE CAREFUL hot glue is well HOT. Then you just continue to wrap the vase in twine, glue twine glue twine etc. until you have it all wrapped up!

                                                                                                                     ENJOY