Friday, May 31, 2013

Resolution Update:Lemonade


How are the rest of you doing on your New Years Resolutions? Anyone still keeping up with them or have you let them go by the wayside? I'm attempting to keep up with mine! Here's my progress...

Organization:
If you saw Wednesday's post you saw that I got some organization done! YAY! This next month I would like to organize my Master Bathroom and the Kitchen! It's kinda of a big task, the kitchen anyway! We  I have so many gadgets and gizmos that I need to really think about what I need and only keep that! Or maybe if it isn't something that I use regularly I can regulate it to another part of the house, like the garage!

Quality Time:
Man-Child and I went to see Star Trek and then went to lunch and then did a little shopping. It was really nice. This next month I am trying to get a list together of things we want to do this summer. A Summer Bucket List if you will. We'll see how that works out! 
Getting Healthy:
I joined to YMCA back in January before the Hubster left, but I've just started a new program they have. It's a 12 week program that gives you a different workout every day. You check back in with a trainer once a month to see how you are progressing. I'm on week 3 and I am making it to the Y 4 days a week. I'm trying for 5 but that just hasn't worked out yet! I haven't seen any numbers moving on the scale BUT I am feeling stronger and that's what counts right? RIGHT? So I thought I would share a nice refreshing drink that is sort of healthy (in that it's homemade and doesn't have any icky weird things in it)

It’s starting to be that time of year when a nice refreshing drink is so appreciated! I love freshly squeezed lemonade! It just screams SUMMER to me and since Memorial Day unofficially marks the beginning of Summer it’s time to get squeezin’ and enjoy some lemonade!


Here’s what you’ll need:

Lemons about 10 juiced

½-1 cup of sugar (depends on how sweet you want it! I use ½ cup)

½-1 cup water (this is for the simple syrup so it depends on the sugar)

3-4 cups Cold Water


Here’s how you make it:

Juice your lemons, I used my juicer! You need about a cup of lemon juice. In a small sauce pan combine your sugar and water (equal parts) and heat until sugar is combined, it takes just a few minutes. Let cool slightly. Pour Juice and simple syrup into a pitcher, add in 3-4 cups of cool Water and stir. You can serve immediately over ice or let it chill in the fridge for about 30 minutes!

ENJOY!                         

Wednesday, May 29, 2013

Operation Oraganize: Hall Closet


Last month I said I was going to get my Hall Closet organized. And guess what? I DID! I also said I was going to do my Master Bath and guess what? I TOTALLY DIDN'T! You thought I was gonna say I did right? Well you know how it is life gets in the way you have the best intentions and BAM you realize it's the end of another month and you didn't get everything on your to do list done! Well I just put it on next month's list along with the kitchen!
I had these great before Pics but my old phone seems to have eaten all my old pictures. Which is so annoying, and frustrating.


Here is the after picture. If you can imagine loads more junk in there then you get an idea of how awful it was!

The Closet:

It was being overrun by jackets and shoes and who knows what else. So I started by taking everything out and cleaning the shelf and vacuuming the floor. Then I went through each article of clothing or pair of shoes and got rid of anything that didn’t fit or doesn’t get worn anymore. There were 2 whole trash bags full of stuff to donate to Goodwill! Then I put things back in, in a more organized manner. All hats, and mittens and gloves were put into a bag and placed on the top shelf. Our Nebraska Snuggies are folded up and easy to get to when we are wanting to snuggle up on the couch. I'm thinking that I would love to put them in a Basket, maybe matching baskets, one for the blankets and one for the hats and gloves. An idea to tuck away for the future! Coats and jackets were hung up and shoes were paired up and placed on the floor. I would love to put them somewhere else but we have limited closets in this house so the Hubsters' shoes go in the Hall Closet! I think it looks so much better now and now I’m not embarrassed to open the hall closet!


ENJOY!

Monday, May 27, 2013

Spaghetti Squash Chinese Noodles


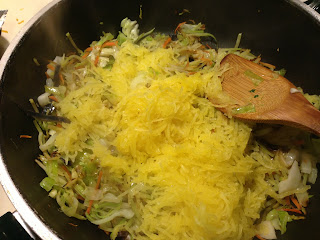
A few months ago I made Chinese Noodles get the recipe here, and then I was thinking how can this be made healthier? I mean after all I am trying to be healthier right? So if I can take one of our favorite dishes and make it better for us then we all win! I decided to switch out the pasta for Spaghetti Squash. I’ve tried Spaghetti Squash before and I like it sort of. It’s hard sometimes to get it to the right consistency. I don’t like my regular pasta al dente I like it a little softer. So the Squash to me is usually al dente. Which is fine but, not my preference. However I don’t want slimy squash either. I think that by first baking the squash and then cooking it again with the veggies it gets a little tenderer.

Here’s what you’ll need:

1 Spaghetti Squash

½ head Cabbage

½ bag of Broccoli Slaw

3-4 TBSP Soy Sauce

½ tsp Fish Sauce

½ tsp Sesame Oil

1 TBSP Butter

 1 tsp Garlic Powder (or 1 clove fresh garlic, minced)

1 tsp Onion Powder (or 1 onion, chopped)

Pepper, to taste


Here’s how you make it:

Start off by roasting the Squash at 350 for about 30minutes or until a fork cuts easily into the squash. Meanwhile cut up the cabbage. When the Squash is done roasting let it cool for about 15minutes. Then shred it with a fork removing all the squash, set it aside.  Place a large skillet over medium heat add in the cabbage and a little water (about 1-2 TBSP) add in the butter as well as the broccoli slaw mix, sauté until they are fork tender.  Then add in the rest of the ingredients including the Squash. If using fresh onion and garlic go ahead and add them in with the cabbage. Let cook for about 10 minutes until all the flavors have combined. You can serve it as is or over rice.

ENJOY!

Friday, May 24, 2013

Easy Button: Banana Pastry Tart


Ever have those days when you want something sweet and yummy but don’t really know what you want? Or those days when you want to make a dessert but are tired of the same old thing. Maybe it’s one of those days that you need to make a dessert for something but don’t have lots of time? Then this is the dessert for you! Super easy Banana Pastry Tart, is a great dish, the brown sugar caramelizes the bananas into a yummy gooeyness that is just well yummy!


Here’s what you’ll need:

1 sheet frozen Puff Pastry

3 Bananas

3 TBSP Butter, melted

3 TBSP Brown Sugar

½ tsp ground Cinnamon


Here’s how you make it:

Preheat the oven to 450. Thaw out the Puff Pastry for only 15-20 minutes; you want it to be very cold still. Peel and slice Bananas place them into a medium bowl. To the Bananas add the Brown Sugar; Cinnamon and Melted Butter gently mix. With a rolling pin roll the Puff Pastry out to a 10 or 11 inch square. With a knife, round off the corners to make a circle.(Next time I would just make it a square tart why waste the dough?) Fold the Pastry edges up ½ inch all the way around. Place the Bananas into the circle in a pattern or you can just lay them in randomly. Bake for 10 minutes Edges of the Pastry will be light brown. Cool for a few minutes and then cut into wedges and serve.

ENJOY!

Wednesday, May 22, 2013

DIY MIRROR REDO

I found this great mirror at Goodwill and it was only 5.99! It had some icky glue all around the outside but I knew that would come off and with some fresh paint this mirror would be awesome when I finished it! And just what I was looking for for my front entry way wall! I've been trying to get my house to have more of a style to it, does that make sense? I sorta of feel like we are stuck in a weird no style boring kind of groove. I think part of it is because we move so much and every house is different that I got into this thing where I just didn't want to try and figure out where to put things in a new house. Another part of my problem is that I have pretty eclectic tastes! Like I love Americana but also love Asian influences oh and did I mention my penchant for the bohemian hippyish style? So trying to pull that all together overwhelms me sometimes! And then I just don't end up putting anything out, which is boring and crazy! 

I got a new phone the other day and totally forgot to upload my pics which sucks so I don't have the before or during pics, Just the after ones. If I figure out how to upload them I will post them! But for now here's what I got!


So Here's what I did:

First I peeled the glue off of the mirror, to do this I just picked the glue off with my fingers, using my nail which if you have nice nails I don't recommend this I kinda no totally messed up my nails. A razor blade would probably have worked better and saved my nails! 

Make sure before you spray paint that you are in a well ventilated area and that you put down cardboard or something that will keep the paint off your floors!

I decided to try this silver metallic spray paint that I already had. I sprayed 3 coats.letting it dry between each coat. I wish it was a little shinier (is that even a word?) Anyways I like it better than what I had before.
Hopefully I figure out how to get the before photos loaded so you can see the difference!


Monday, May 20, 2013

Taco Salad


When the Hubster and I first got married he wouldn't eat very many veggies. I'm talking peas, corn and green beans that's it! Salads were out of the question. So I gradually started introducing him to new veggies, like broccoli with cheese sauce, had to have the cheese sauce! Then I would only put a little but of cheese on it and finally none at all, and now he eats broccoli all the time. I did this with other things too like lettuce, he hated salad! But I really like to have a salad with dinner and we finally figured out that he likes green leaf lettuce and ONLY green leaf, not iceburg, not romain! So one night after he had been eating salads for quite awhile I decided to make taco salad, you know with the Doritos and taco meat and French dressing! Well he actually liked it, but asked if I could try it next time with Ranch dressing, so I did and we all liked it! I love that he is eating healthier now! Well at least when he's at home!
I decided to make the traditional taco salad a little healthier! Subbing spinach for the lettuce and ground turkey breast for the ground beef.

Here's what you'll need:
1/2 lb ground Turkey Breast
1 pkg Taco Seasoning
1 small bag Spinach
1 Tomato
1 can Kidney Beans
Ranch Dressing
Doritos Cool Ranch Chips
1/2 cup Shredded Cheese (your choice, I used a Colby/Jack blend)


Here's how you make it:
Brown turkey in a medium skillet then add taco seasoning and water. Let cook for a few more minutes and then let cool slightly. Meanwhile in a large bowl, combine the spinach, tomato and beans. Then add the Taco meat. Add in the chips I use about two handfuls and crush them up as I put them in the bowl. Then sprinkle on the cheese and pour on the Ranch Dressing, using as much as you think you need! You want it to lightly cover the rest of the ingredients but not coat everything! Toss the salad together and serve. You can also add the dressing to individual servings of the salad to limit the amount of dressing used!

ENJOY!

Friday, May 17, 2013

Strawberry Stack Ups


One of my favorite things about Spring is when the Strawberries begin to be in season! I love when I walk into the Grocery Store and you can smell the berries. It’s like they are calling out to me buy me buy me… And of course then it makes me want Strawberry Shortcake. So I wanted to do a little spin on the Shortcake. I had some crescent roll dough sheets and I thought ok can I bake these up and use them as the shortcake?! So that’s what I did!

Here’s what you’ll need:

1pkg Crescent Roll Dough

1/4 cup Butter, melted

Cinnamon/Sugar

1qt. Strawberries, sliced

Sugar

Whipped Cream


Here’s how you make it:

Roll out the Crescent Dough onto a baking sheet. Cut it into squares. Brush the dough with Butter and sprinkle with the Cinnamon Sugar. Bake according to the package directions. Meanwhile Sprinkle the sliced Strawberries with about a tablespoon of Sugar and set aside.

To assemble the dessert:

Lay one piece of the dough on a plate, next spoon some Strawberries on top of the dough. Add another square on top of the Strawberries add a few more berries and then top with Whipped Cream and Serve.

ENJOY!

Wednesday, May 15, 2013

Childs Apron


As a little girl I was always in the kitchen “helping” my Mom. She started my sister and me cooking at a young age. Even my Grandma’s would get us in the kitchen when we would go visit. Whether it was rolling out dough for a pie or making a batch of chocolate chip cookies we had a hand in it. And the best part was enjoying the goodies that we had helped create! I think getting kids into the kitchen learning how to cook is so important and love it when Man- Child wants to help me cook or now even cook on his own! My niece is starting to help my Sister in the kitchen and I thought that she needed an apron! I found these cute Dishtowel and Potholder sets at Wal-Mart and thought they would make such a cute apron for a little girl!

Here’s what you’ll need:

1 Dishtowel

1 rectangle Potholder

Coordinating Ribbon

Thread


Here’s how you make it:

Cut the Dishtowel in half. Cut the ribbon to be twice the size of the dishtowel. Pin the ribbon onto the Dishtowel so that the right sides are together leaving an equal length of ribbon on each side. Sew the ribbon onto the Dishtowel. Then place the Potholder in the center of the towel, pin it into place. Then sew the ribbon onto the Potholder. Next tie a length of ribbon onto the loop of the Potholder making sure it is long enough to tie around the Childs neck.

ENJOY!